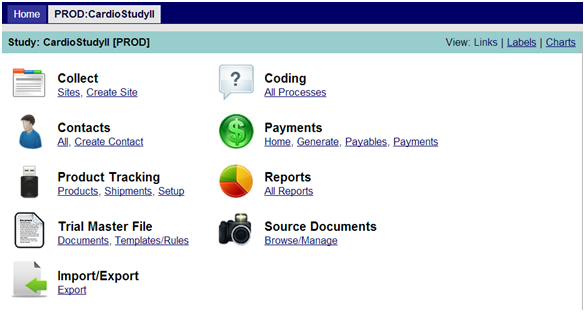
After logging in, the user will see the study, or a list of studies, he/she has access to. Select a study by clicking on the underlined study name/hyperlink. The user navigates to the Study Landing Page displaying the modules accessible to the user. See Figure 1 below for a view of the Study Landing Page and available modules. [Note: Not all modules visible below may be accessible to the user.] Click on the underlined links to navigate to the desired module/screen.
Figure 1: Study Landing Page

As an extension to page navigation, some pages have multiple views. See User Preferences for additional information on setting preferences.
A. Messages
Messages will appear under the navigation path (see figure above) throughout MAESTRO. They can range from a successful password change, to a new study created. Or, they could give an error response due to an incorrect date format to an incorrect file selection.
B. Navigation Path/Environments
When you are normally using the system, you are using the production environment. This is the place where the live data is being collected for the study.
There maybe times when you need to train or perform other activities that IS NOT to be part of the production environment. Other systems may have a different site (web URL) that you are directed to and test login account that is to be used for this purpose.
Maestro can work in this fashion, but has additional "logical" environments that it supports. When you are performing training, you are probably accessing the same site as the production environment, but are entering data into a non-production environment.
Note the navigation path (see B above), which indicates a production environment
Each environment currently supported by Maestro are as follows (abbreviation shown in navigation tabs, and description):
PROD - Production environment
TEST - User test and training area
DEV - Development area used by designers for upcoming changes
So, how do you gain access to an environment? Great question!
On your home page, there is a Show all environments check box. By default, that is unchecked, meaning you only see the production environments. By checking this, you will see ALL the environments you have access to. Similarly is the Show Inactive check box depicted above (see D)
As shown, the user has been granted access to the MYDEMO study, the "Production" and the "Test" environments. By clicking on the "Test" row of MYDEMO, you will enter the test environment
Whenever you navigate back to the Home page, the Show all environments check box goes back to unchecked. It is standard operating procedure to not allow access to the Production environment until training has been performed; this is done to prevent entering training data into the production environment.
NOTE: Once you are done training, you may wish to have your TEST access removed by the Maestro administrative staff so you do not accidentally enter live data into this area.
Having these multiple environments allows the clinical staff (primarily the sponsor) to see and test changes prior to enabling them in the production environment. They can be used as well to train the sites in upcoming form changes they will soon see
C. Show/Hide Sidebar by selecting this link, you can either show or hide the sidebar.
D. Actions This area will have a list of available actions you may perform at each page; From creating a new study, to updating a subject