Layout Engine
Understanding how the layout engine of the CRF generator is the key to making effective forms. This section is designed to help you with that.
The Default Template
By default, items are laid out in a simple top-town fashion. Use generic "blocks", this is depicted below:

This is a simple model, which can work well for early versions of your forms. When the study design is very dynamic, you do not want to waste a lot of time trying to layout your elements, as these may change as new items are added, questions dropped, etc. The default behavior is intended to provide a simple layout.
In this layout, the numbering cannot be indented, but the prompt level can be indented to depict a dependency in the two questions. A sample specification row and the resulting output are shown below:


You can see that the date should be collected only if the gender is female. Indentation levels can be done up to a level of 5. If you want alternative numbering on the indented elements (like 4a in the above), the prompt can contain this text and you can leave the number column blank.
This example does not show a nesting of elements – only indentation – there is a difference. Indentation just affects the prompt area, but nesting affects the input area that contains the controls (input area on paper forms). This allows you to have a single prompt, but multiple data points that can be collected from that prompt.
An example of nesting is shown below. Note how the Name and Parent columns of the item are used to signify this nesting.

Output...

Now, this example is a little more complicated, as this nesting is contained within a table, which has nested columns to make a more advanced layout, but you can see the ability to make the input controls have a nested.
How Numbering Works
While not yet discussed, sections of a form are defined once and can be used multiple times. This could be a common set of questions that are asked at one visit – hence on a visit "A" form – and then asked again at a second visit – so also on visit "B" form. It would be nice to only define that once, and section allows you to do that.
When a section is used in more than one location (even within the same form) the numbered questions/items will have a distinct number using the numbering algorithm of the generator. Basically, your specification will always start numbers at "1" within a section. The generator factors into account the previous sections which applies an offset (adds this offset to your section numbers) to get the final number of the question.
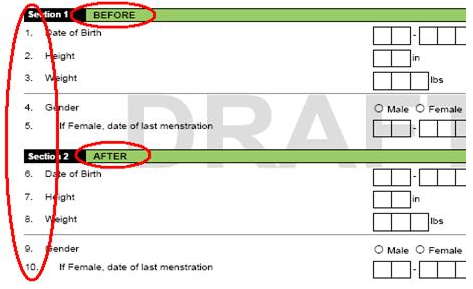
A simple example can be used. Here, the same section is used once with the tithe "Before", and once "After", and show in the following portion of the Forms tab:

And in that section you have...

The output looks like...
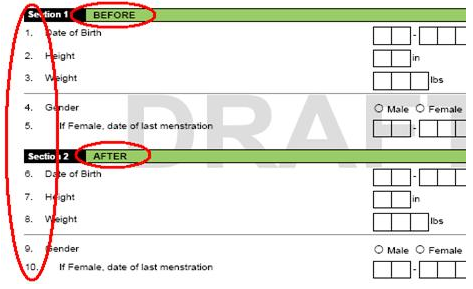
Please refer to Sections for more information.
Design Elements
This section will take a top-down approach to designing the CRFs and not necessarily in the order of tabs in the spreadsheet.
You should organize your data into forms. You should also try to identify common sets of questions that will be collected and try to group them into sections, as they can be reused.
Forms
A form represents a CRF. The generator will create a single instance of each form in your specification. Page numbers restart at 1 for the start of each page.
A form is made up of sections, as shown from the example taken from the Forms tab.
This example shows a form named "Base" that has 3 sections named "Base1", "Base2" and "Test". Both "Base1" and "Base2" are instanced of the "Base" section – an example of reuse.
The form is used for multiple visits, and those visits are defined in a list called "Visits".
This form also indicates the form will have a signature section at the end.
Forms have sections. Sections can be repeating, which creates a tabular input area, or a non-repeating top-down set of sections. The section title is shown (if given), that will delineate the group of questions.
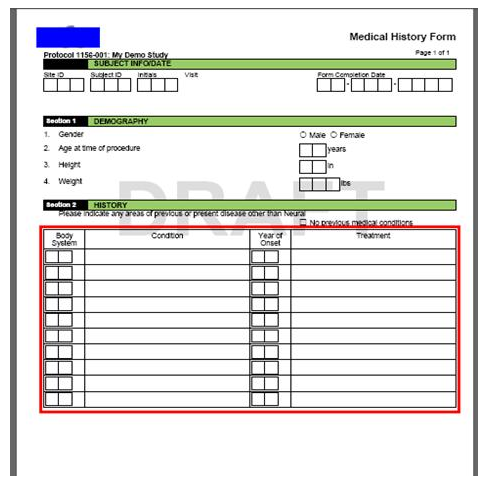
The example above had no repeating sections. This example shows a repeating section that will have 10 rows on the printed form, but will allow up to 99 within the system.


You can see that items from within the section are displayed in a tabular form.
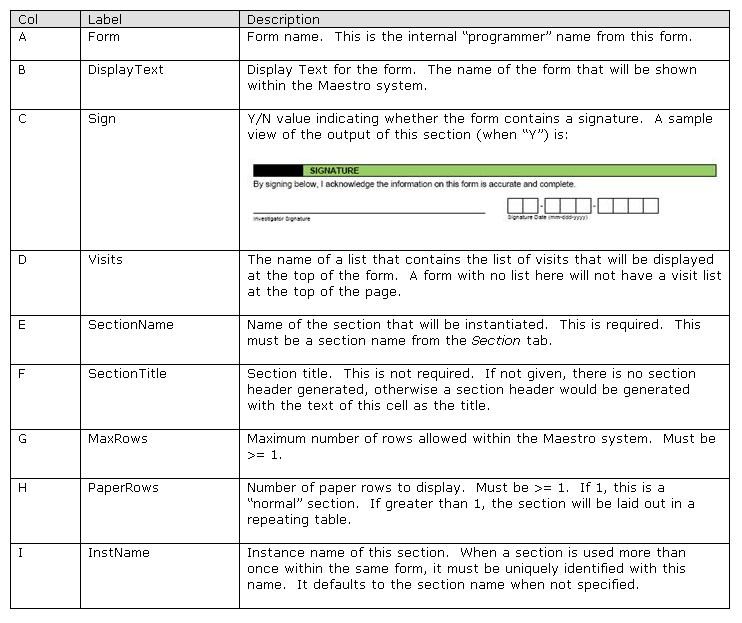
The following table describes each column on this tab:
Forms have a number of default attributes and are reflected in the template available for download. These can be overridden on a form-by-form basis in the Attributes tab.
To override the attribute for a form, use the form name instead of "default" in the item in the attributes tab.
Consider the following default items in the attributes tab:
Output for the header...

If the name of this form is "FUP", you can change the header for this form and leave others using the default by adding the following to the Attributes tab.

Output for the changed header...

You can change the format of the subject and site ID section if necessary or eliminate the initials section of the header.
Sections
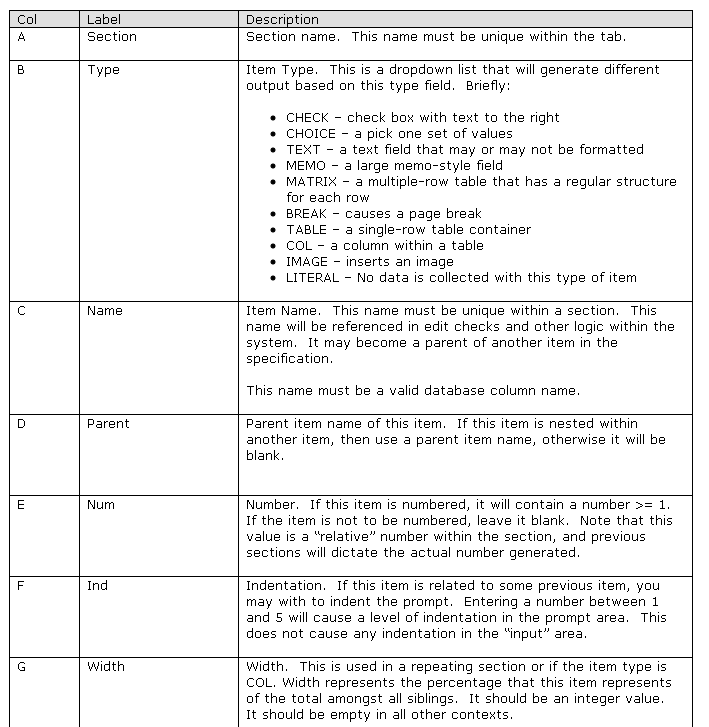
A section represents a group of questions that are related.

The following table describes each column on this tab:

Choices
The following table describes each column on this tab:
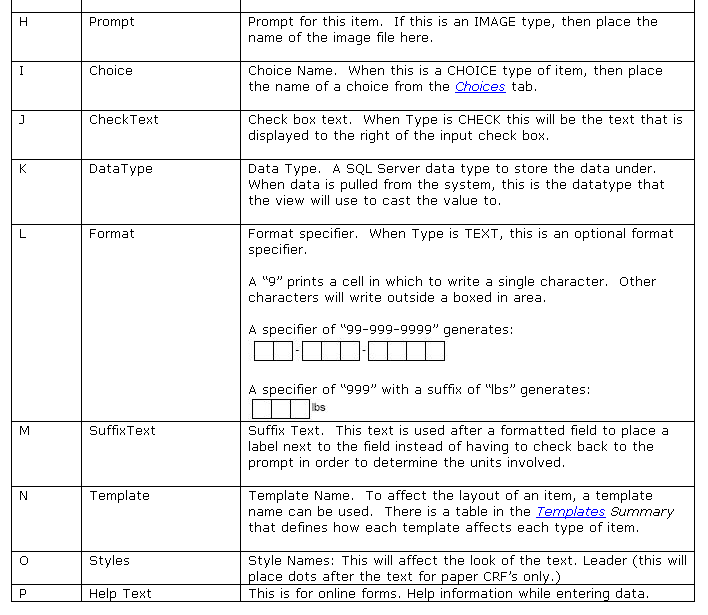
Example of a choice list

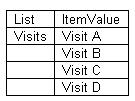
Lists
The following table describes each column on this tab:

Example of Lists

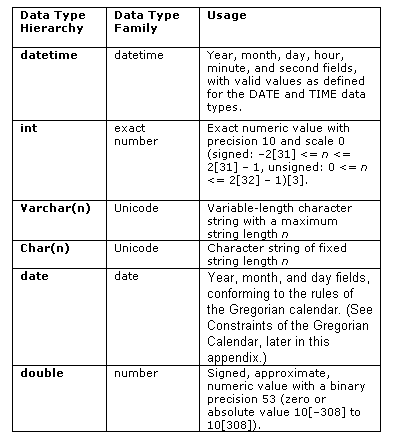
Data Type
The following are various types of DataType and how you would use them.
Attributes
The following table describes each column on this tab:
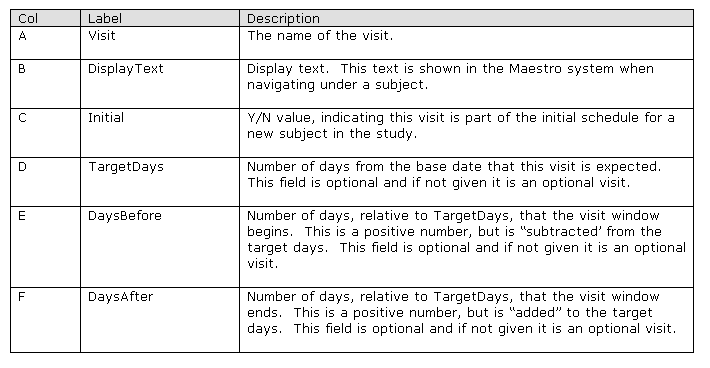
Visits
The following table describes each column on this tab:
Schedules
The following table describes each column on this tab:

Example of Schedules tab:
Templates (layout) Summary
There are many types of items that can be specified in the design specification. Each of these item types has a set of Templates that control the layout behavior of the item in the specification.
Below is a summary of the Item Types that can be selected in the Sections tab, and the corresponding templates that can be applied.
