Cookbook
Examples of creating a form
This is an example of Other Treated Lesion Form. This form is complex and uses table, choices and much more.
The following example is using the forms tab:

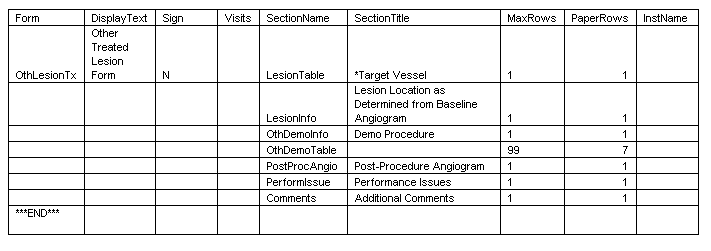
As you see column Form has an abbreviated name this is only used for Data management and does not show up on the paper forms, but is required for the system. Also note that all the rows below the Form text are blank in this column. That means all the rows belong to this form, when you want to create a new form you will add another name in this field. The DisplayText is actually what is shown on the form. This form does not require a signature and there are no required visits. Note: The SectionName is abbreviated and is only for data management and this field is what you would carry over to the Section Tab. SectionTitle is the name of the section that is shown on the form. MaxRows is how many rows you would like the database to have and PaperRows is how many you want on the paper form. InstName is blank which mean these set of questions will not be used on any other forms or sections.
This is an example is using the section tab looking at LesionTable section.
Here is what it will look like once it has generated:
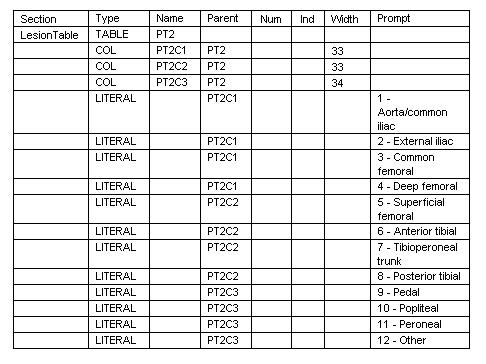
Note: Name and Parent in the sections tab. The Table has a Name of PT2 and the first COL Type has a name of PT2C1 and Parent of PT2. This means each of these columns will be in the same table. Now notice the first Type of LITERAL the Parent is the same as Type COL Name. This example shows the first 4 Target Vessels will go in column 1, the next 4 in column 2 and so on.
Here is an example of LesionInfo on the section tab. This example is only showing the columns that are filled out.
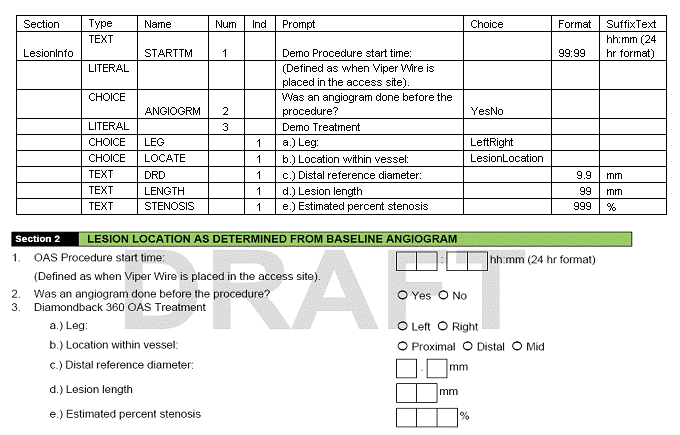
Notice that question one has two boxes a colon and two more boxes this is done by placing 99:99 in the format column. In question 3c you see 1 box dot and another box. This is done by placing 9.9. Also you may have noticed they have a suffix behind them like hh:mm this is done by placing what you want in the suffix column.
Questions 2, 3a and 3b have radial buttons for you to pick one of the selections. This is done by selecting Choice in the Type column and placing a choice in the choice column that is associated with the choices tab. In question 3 it has question a – e indented, this is done by placing 1 in the IND column.

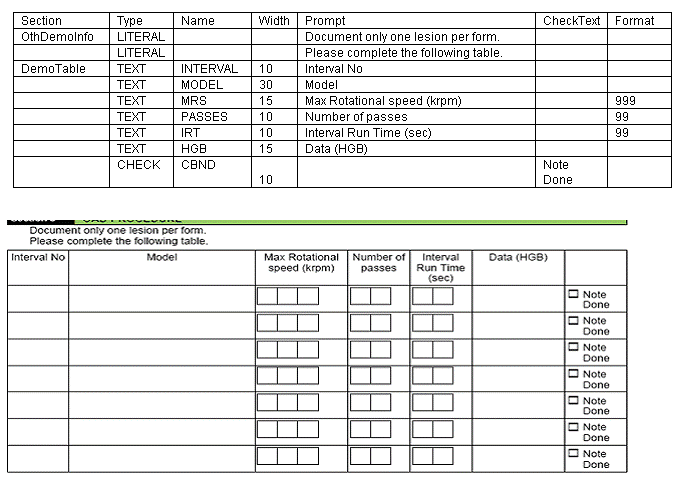
If you notice this example has seven rows. This was done on the forms tab a 7 was place in the paperrow column. Also notice in the sections tab the width is filled out. This is how wide you want each column.
The following example uses a memo field:
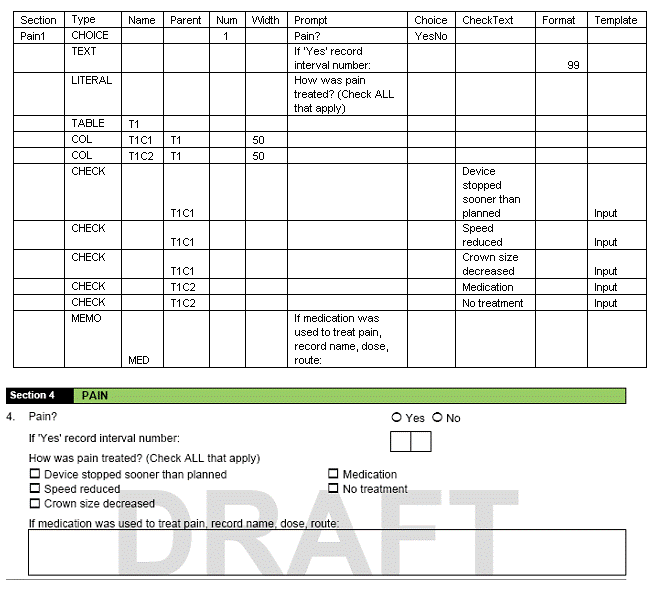
The above example shows the use of the memo Type. This is a default size memo box if you would like it small size you would put SmallMemo in the Template column. See sections for more information.
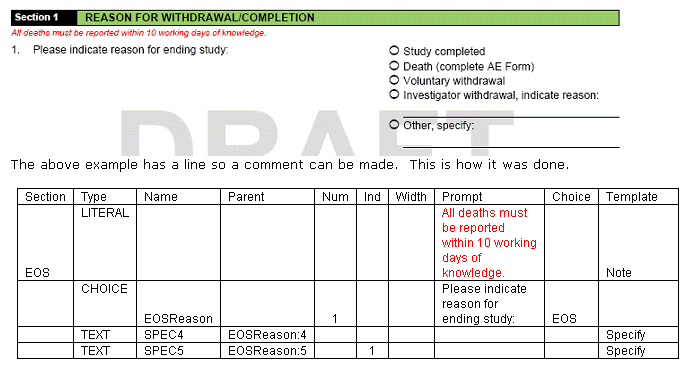
The above example has a line so a comment can be made. This is how it was done.
Using the Template Specify will give this line. Also do you notice the red comment in a smaller font? Use the Template of Note to make the font smaller.
The difference between Type Choice and Type Check:
Type Choice only one choice can be checked in the database and Type Check many can be checked. On paper of course they can check as many Choice options as they want but the database will only allow one.
Forms Tab InstName column examples:
Below is an example of when to use the InstName on the forms tab
Below is an example of the sections tab.

Below is what this looks like once we generate it.
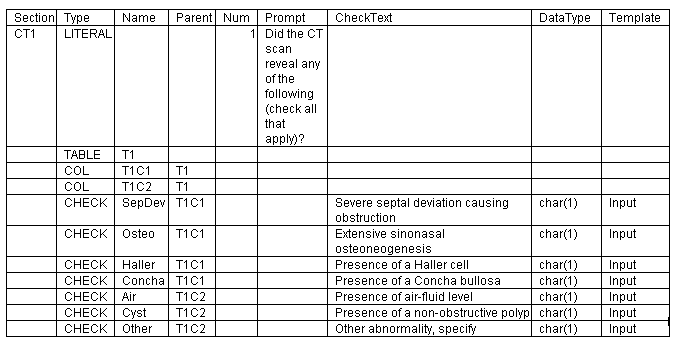
Notice in the sections tab we only reference these questions once. Because we had CTLeft and CTRight in the InstName, it appeared under both sections.