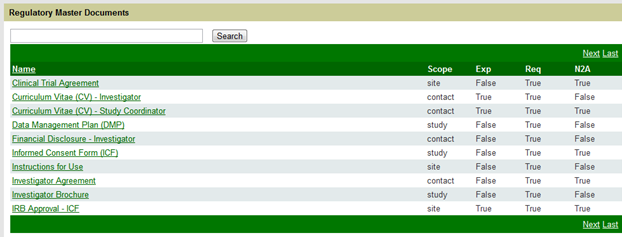
From the Master Documents link you will see a screen that shows all Master Documents that have been entered for the study. (See Figure 3 below.) [NOTE: Your list will not be populated if you have yet to create your master documents. Once populated, it will look similar to the screen below.
Figure 3: Master Document List - Populated

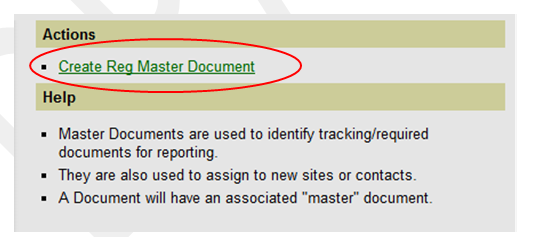
On the right side of the screen you will see a Create Reg Master Document link. See Figure 4 below.
Figure 4: Create Reg Master Document Link

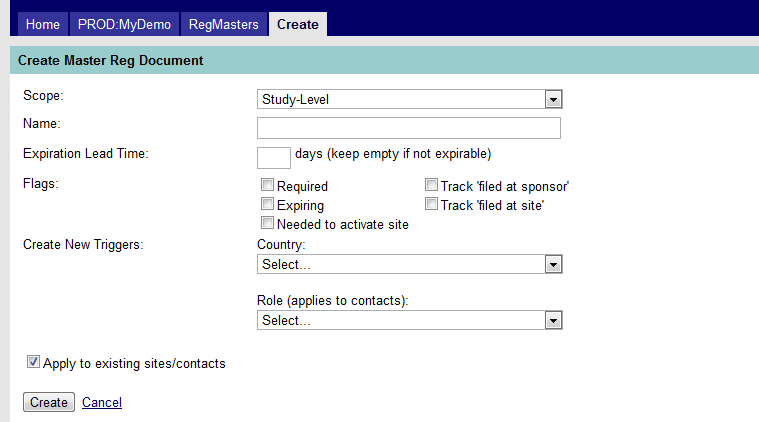
Click the link to create a new master document. The Create Master Reg Document screen will appear. See Figure 5 below.
Figure 5: Create Master Reg Document

The above screen capture shows the following fields:
- Scope. Indicates whether the master document applies to the study, sites, or contact (e.g. primary/principal investigator, study coordinator). The scope value defaults to “Study-Level” if no other selection is made.
An important part of creating a master document is to identify the document as: 1) a Study-Level document; 2) a Site-Level document; or 3) a Contact-Level (e.g. investigator, study coordinator) document. As you save master documents by clicking on the “Create” button, and if the check box “Apply to existing sites/ contacts” is checked (which appears directly above the “Create” button on the screen), MAESTRO automatically creates a copy of that master document as a related document for all sites or contacts, as assigned in the Scope field and the Create New Triggers fields if used. [NOTE: If you have all of your sites and contacts in the database prior to creating your master documents, and the “Apply to existing sites/contacts box” is checked, the document will be copied for each applicable site or contact. If not, you will have to manually create documents for each site or contact.]
- Name. Enter the name of the Master Document. (This is a required field.)
- Expiration Lead Time. If applicable, enter the lead time, in days, when a document will appear as “expiring” on the “Expiring Documents by Site” report. (e.g., if a document expires on April 30, and you desire the document to appear on the report you run on February 1st, enter 60 days.) Leave the field blank if the document does not expire. [NOTE: MAESTRO can be programmed to provide email notification of an expiring document. See your Libra Medical representative for more information.]
- Flags. One or more flags may be assigned to a document to help to identify it as described below.

- Required: Checking the “Required” box indicates that the document is required to be on file and will be reported as “missing” if the Effective Date does not have a value. [NOTE: The expiration date (and effective date) is entered when customizing the individual documents from the Documents screen.]
- Expiring: Checking the “Expiring” box indicates that the document (or approval of that document) expires. [NOTE: The expiration date (and effective date) is entered when customizing the individual documents from the Documents screen.]
- Needed to activate site: NOTE: This field is not currently functional. When implemented in a future version of MAESTRO, it is intended to indicate that a certain document must be received in order for a site to be considered active.
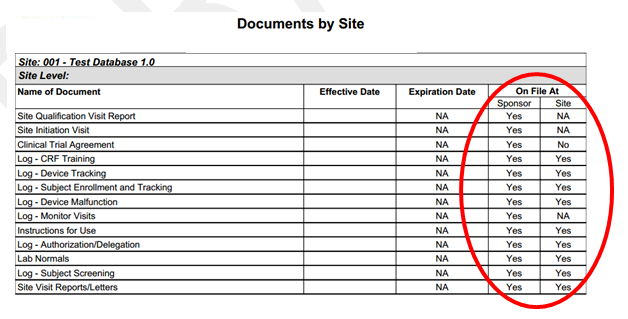
- Track ‘filed at sponsor’: Checking this box indicates that the document is required to be filed with the Sponsor. If this is checked “yes” at the master document level, but checked “no” on the document level (indicating that though this document is required, it is not yet on file with the Sponsor), the document will appear on the “Missing Documents by Site” report. You will also see an indication of the filing status on other reports, such as the “Documents by Site” report as shown in Figure 6 below.
Figure 6: Filing Status Indicator: Sponsor | Site

- Track ‘filed at site’ – Checking this box indicates that the document is required to be filed with the Site. If this is checked “yes” at the master document level, but checked “no” on the document level (indicating that though this document is required, it is not yet on file at the Site), the document will appear on the “Missing Documents by Site” report. You will also see an indication of the filing status on other reports, such as the “Documents by Site” report as shown in Figure 6 above.
- Create New Triggers. There are two “triggers” with drop-down lists—Country and Role--that will determine whether a master document will be applied/copied to a site or contact. These triggers are used when there are: 1) multiple countries participating in a trial that use different document versions; and 2) multiple roles assigned to personnel involved in the trial where the role will determine whether or not a master document is applied/copied to a contact. The Country field in the Master Document is linked to the Country field in the Sites screen; the Role field linked to the XX field in the Contacts screen.
- Apply to existing sites/contacts. When creating a master document, check this box to create a copy of that document for all sites or contacts as assigned in the “Scope” field. If not checked, it will not be applied to all existing sites or contacts but rather be entered manually.
Once a master document is created, it will appear in the list of master documents for a study (see Figure 3 above) and may be edited at any time by clicking on the name of the master document. The edit screen functions the same as the create screen with one exception: the “Apply to existing sites/contacts” checkbox is absent from the edit screen. As previously mentioned, documents will need to be created/applied to a study, site or contact manually if the site or contact is added after the master document is created.


