[Note: Use this method if the product number is known.]
Step 1: From the Study landing page, click on Shipments in the Product Tracking module. Click on the Create Transfer link located in the sidebar of the Shipments screen as shown in Figure 1 below.
Figure 1: Create Transfer Link

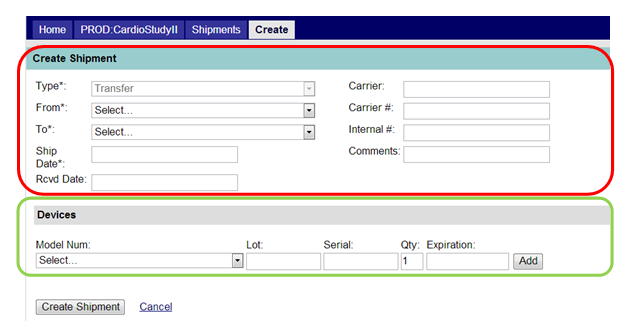
Step 2: The return Type defaults to “Transfer”. Enter the required fields (*starred) at a minimum. See area outlined in red in Figure 2 below.
Figure 2: Create Transfer Shipment

Note the following descriptions for the fields shown above:
Step 3: Complete the following fields in the Devices section for each product in this transfer shipment, outlined in green in Figure 2 above.
[Note: If transferring more than one item from the same Lot and the serial numbers are sequential, enter the first serial # in the sequence and the quantity of products being shipped. Click “Add” and MAESTRO will automatically create the remaining products with that same model and lot numbers and expiration date, auto-numbering the remaining serial numbers. The auto-numbering feature for serial numbers may be used only once per shipment, so if planning to use it, add the pertinent product first in a given shipment. Once the auto-number feature is used in a shipment, the quantity field is no longer visible for subsequent products in that shipment.]
Step 4: When all devices/products have been entered for a shipment, click the “Add” button. That item will appear directly below the selection area (outlined in red in Figure 3 below).
Figure 3: Add a Device/Product

Step 5: Once users have entered and added all items for that transfer shipment, click the “Create Shipment” button in the bottom left corner of the Create Shipment form. The shipment is not saved until the “Create Shipment” button is clicked.
[Note: MAESTRO does not currently have a receipt step for a shipment, return, or transfer. All products in a shipment are considered immediately available at the destination once the shipment is created.]