To perform certain activities in MAESTRO (e.g. record a shipment, assign a product/device to a site or subject) product information must first be entered. This Section describes the process of adding products (a.k.a. models) used in the study.
Models typically reflect products of varying sizes, but they may be delivery mechanisms or other periphery parts involved in delivering or placing/securing a product. Product may also refer to a drug or particular dosage of a drug. To add a product, follow Steps 1-4 below.
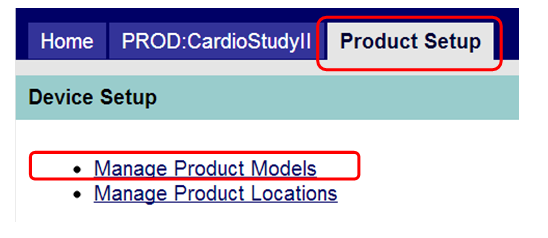
Step 1: Click on the Manage Product Models link as shown in Figure 1 below.
Figure 1: Manage Product Models

Step 2: Click on the Create Model link in the Actions sidebar as shown in Figure 2 below.
Figure 2: Create Model Link

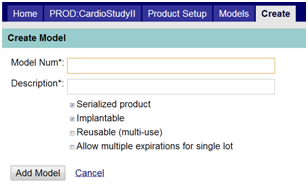
Step 3: Enter the required fields (*starred) at a minimum. See Figure 3 below.
Figure 3: Create Model Form

Note the following descriptions for the fields shown above:
Check the following boxes where appropriate. If unknown, mark as “no” (unchecked).
[Note: Navigate between fields by pressing the TAB key. The SPACE bar toggles the check box, or users may simply click on it with their mouse.]
Step 4: When complete, click the “Add Model” button. The model will now appear in the Models tab.
Repeat steps 1-4 to add additional products.
If your product is serialized, serialization may be automatically assigned to a subject from within a CRF if that information is captured.